If you’re thinking about your first microneedling session, you’re in good hands. We’ll walk through what the treatment is, how to prepare, what happens during and after, and how to get the most from it. You’ll feel more relaxed — and ready — when you walk in.
What is Microneedling?
Microneedling is a skin rejuvenation treatment that uses tiny, sterile needles to create micro-injuries on your skin’s surface. These controlled pinpricks trigger your body’s natural healing process — encouraging new collagen and elastin production.
Why Should You Consider It?
Maybe you’ve noticed uneven skin, scars, or just want a fresher look. Here’s why microneedling can help:
- It helps smooth the skin surface and reduce rough texture.
- It can reduce the appearance of acne scars or stretch marks by promoting skin renewal.
- It’s less invasive than many treatments — less downtime.
Are You A Good Candidate?
Okay — important part. Let’s check if this is right for you.
You’re likely eligible if:
- You’re in overall decent health (no major skin infections or unhealed wounds).
- You want to improve skin texture, scars, fine lines or tone.
- You’re prepared to follow the before-and-after care.
You might want to wait or avoid if:
- You have an active skin infection (cold sores, eczema flare, etc).
- You recently had a different aggressive skin treatment and your skin is still healing.
- You’re using medications or supplements that slow healing, like some blood thinners.
In short — talk with your clinic about your full skin history and any medications.
What to Prepare Before Your First Session
This part matters — how you show up affects how smooth and effective the experience will be. Let’s walk through the prep.
1. Stop certain skin-care products
A few days before your appointment, stop using:
- Retinoids or retinol products.
- Acid-based products (AHAs, BHAs) or strong exfoliants.
- Tanning beds or heavy sun exposure for at least 24-48 hours before.
Why? Because your skin needs to be calm. These products could irritate or compromise the treatment.
2. Hydrate & avoid certain substances
- Drink good water in the days leading up to your session.
- Avoid alcohol for at least 24 hours prior, as it may increase bleeding or sensitivity.
- Avoid anti-inflammatory medications like ibuprofen unless your provider clears it. Some may suggest tylenol instead.
3. On the day of your appointment
- Come with a clean face. No makeup, no heavy lotions or perfumes.
- If your skin shows signs of active issues (breakout, cold sore, raised rash) you might be asked to reschedule.
What Will Happen During Your Session?
Let’s sit down together, sip our coffees, and I’ll tell you how this plays out step by step.
Step 1 — Consultation and skin check Your provider will review your skin, talk about your goals, any medical conditions, and what to expect.
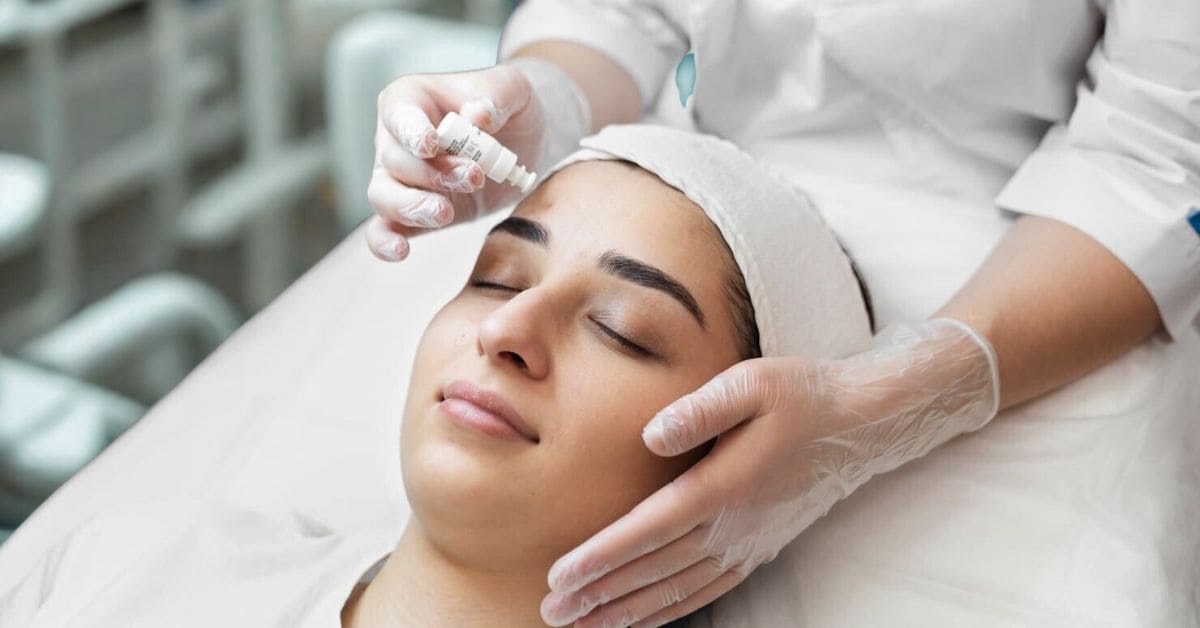
Step 2 — Cleansing & numbing Your skin will be cleansed thoroughly. A topical numbing cream is typically applied so you’re comfortable during treatment.
Step 3 — The microneedling process Using a device with very fine needles (or stamps), tiny controlled punctures are made in your skin. This triggers your body’s repair process.
Step 4 — Post-treatment soothing Once the needling is done, a soothing mask or serum is applied to help comfort your skin.
Timing: Typically 30–60 minutes for the full session (face only) depending on the area and device.
How it can feel: You’ll likely feel some pressure or mild discomfort, but thanks to the numbing cream it shouldn’t be too intense. Your skin may feel like you’ve had sunburn when it’s over.
What to Expect After the Session & Recovery
Here comes the downtime and care section. Following this will help you maximise results and reduce side effects.
Immediately After
- Your skin will likely be red and may feel tight or warm — like a sunburn. This is normal.
- You may also see very tiny pinpoint bleeding or bruising if deeper needling was used.
First 24–72 Hours
- Avoid makeup for at least 24 hours so your skin can breathe.
- Use gentle cleansers. Avoid harsh products, exfoliants, or scrubs.
- Minimise sun exposure; your skin is more sensitive. Wear broad-spectrum SPF.
Days 3–7
- Your skin may start to look a little flaky or dry as it renews.
- You can slowly return to your normal gentle skincare as advised by your provider.
- Avoid heat (saunas), intense workouts that cause heavy sweat, or anything that irritates your face.
Weeks After
- The glow? Yes, you’ll likely notice some improvement within a few days or weeks. But deeper results take time.
- If you’re treating scars or deeper concerns, you’ll probably need multiple sessions for best effect.
Benefits vs Considerations (Let’s Be Real)
Benefits
- Minimally invasive: less downtime than many skin resurfacing treatments.
- Can improve texture, tone, scars, pore appearance.
- Can be customised by your provider based on your skin type.
Considerations
- It’s not magic overnight. Full results often require more than one session.
- Your skill of the provider matters. A trained, experienced professional matters big time.
- Post-care is essential. Skipping aftercare instructions may affect the result.
- Some mild risks: redness, sensitivity, temporary swelling, even less common risks like infection or pigmentation change if not done properly.
How to Maximize Your First Session’s Results
Because you want your skin to look great — here are tips that truly help.
- Choose a reputable clinic with licensed professional staff.
- Be honest about your skin, meds, lifestyle. The provider needs all info to customise the treatment.
- Follow all prep instructions: skip retinols, acids, heavy sun.
- After your session, stick to the gentle care. Use the products recommended by your provider.
- Protect your skin from sun — consistently.
- Stay hydrated. Your skin heals better when you’re hydrated.
- Be patient. Use this as part of your skincare journey, not one single fix-all.
Typical Cost & Session Frequency
Here are ballpark ideas so you’re not surprised.
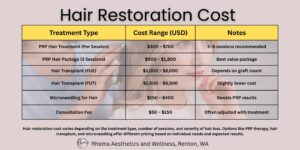
- Cost: Clinics often charge between $300 and $700+ for a session. Prices depend on the area and device used.
- Frequency: Depending on your goals (scars, texture, tone) you might need 3–6 sessions, spaced 4–6 weeks apart.
Should You Book Your First Microneedling Session?
If you’ve read this and you feel excited — you’re ready. If you still have hesitations — totally fine. Let’s check a few questions:
- Do you have honest skincare goals (texture smoothing, scar fading, tone improvement)?
- Can you avoid harsh products and heavy sun exposure for at least a week before and after?
- Are you prepared for multiple sessions if needed?
- Have you found a clinic/provider you trust, who listens, explains, and sets realistic expectations?
If you answered “yes” to most — go ahead and book the consultation. If you answered “no” to many — start by doing your homework, prepping your skin, and choosing the right time.
Final Thoughts
Imagine walking in with calm, prepared skin. Imagine leaving with a post-treatment glow and knowing you’re taking a real step toward smoother, healthier skin.
Yes — we’re being real and transparent here. Microneedling isn’t a one-and-done miracle. But done right, it’s a powerful tool in your skincare journey.
At Rhema Aesthetics & Wellness, we’re here to support you every step of the way. Want to discuss our clinic’s procedure? We’d love to talk about your skin type, costs, recovery time, or the device we use!
When you’re ready, let’s take that first step together. Your skin will thank you.